The Robot Operating System (ROS) is a flexible framework for writing robot software. It is a collection of tools, libraries, and conventions that aim to simplify the task of creating complex and robust robot behavior across a wide variety of robotic platforms – https://www.ros.org/
To put it more simply, ROS will give us the possibility to write and run different processes (called nodes) that communicate with each other by sending and receiving messages on named buses (called topics) or by calling remote procedures (called services). Please read the ROS/Concepts Wiki page to get a more clear overview of the concepts related to ROS.
This section will describe some basic ROS functionality that can be accomplished with stock Leo Rover.
ROS comes with some command line tools that can help to introspect the current network of running nodes. Some of the available tools are as follows:
Let's try running some examples. Before that, connect to Leo Rover via SSH.
Start by reading currently running nodes:
You should see most of all the nodes described in the first section of this tutorial. Among them, the rosserial server node (called /serial_node in this case) "bridges" communication with the CORE2 board, so any topics it publishes or subscribes are created and used in the firmware.
Let's get more information about this node:
You should see all the subscribed, published topics and services that the firmware provides. You can learn more about each topic in leo_firmware README page.
Among published topics, you should see the /battery topic. Let's read the published values using rostopic tool:
Now, let's look at the /cmd_vel topic. This topic is used by the firmware to receive drive commands. We can look at its type:
You should get geometry_msgs/Twist. This is a standard message in ROS for commanding velocity controlled ground robots. We can look up the message description using rosmsg tool:
The description should look like this:
The linear field represents linear velocity (in meters per second) along x, y, z axes. angular field represents angular velocity (in radians per second) along the same axes.
For differential drive robots like Leo Rover, only linear.x and angular.z values are used.
We can use rostopic tool to actually command the rover to move forward, by sending messages to /cmd_vel topic:
The rover should start moving forward with a velocity of 0.2 m/s. To stop message publishing, simply type Ctrl+C.
The -r 10 argument tells the rostopic tool to publish the message repeatedly 10 times per second instead of publishing only one message. This is necessary because the firmware implements a timeout that will stop the rover if it doesn't receive the next command after some time (half a second by default).
ROS provides several client libraries that let you write ROS nodes in different languages. The most common ones are roscpp for C++ and rospy for Python.
Here is a simple Python node that commands the rover by publishing to /cmd_vel topic:
Copy this script to Raspberry Pi filesystem.
Add execute permission to the file:
And execute it by typing:
The rover should drive forward and backward, then, turn in place in left and right directions.
LeoOS provides an easy mechanism for adding new functionalities without building any of the base packages. The whole process of starting the ROS nodes at boot can be summarized by the following files:
On top of that, the leo systemd service starts the leo-start script when the computer boots.
To start the nodes manually, first, you need to stop the ones that are currently running. You can do this either by using the leo-stop script:
or by stopping the leo service:
If you wish to disable the service from starting at boot, you can type:
To turn the service back on, just type:
Now, to start the nodes manually, type:
Type Ctrl+C to stop the nodes and exit the script.
To add additional nodes to be started, you can modify the /etc/ros/robot.launch file. Take a look at the launch file XML specification (especially the node and param tags) for reference.
Here's an example that uses node and param tags:
Modify it to your needs, add it to the /etc/ros/robot.launch file and restart the nodes.
If you want your additional functionality to be easily switchable, you can put these lines, embedded into <launch> tag, into a separate file (e.g. /etc/ros/function1.launch) and add these lines to the /etc/ros/robot.launch file:
Then, add this line to the /etc/ros/setup.bash file:
Now, you can toggle the functionality simply by changing the USE_FUNCTION1 environment variable and restarting the nodes.
When integrating a sensor or other device to your rover, you might sometimes want to extend the robot's URDF model to:
You can create a separate URDF file for your attached device like this one:
And include it in the robot's main URDF file by adding:
Now, when you restart the nodes, a new URDF model should be uploaded to the Parameter Server and you should be able to view the new model in RViz.
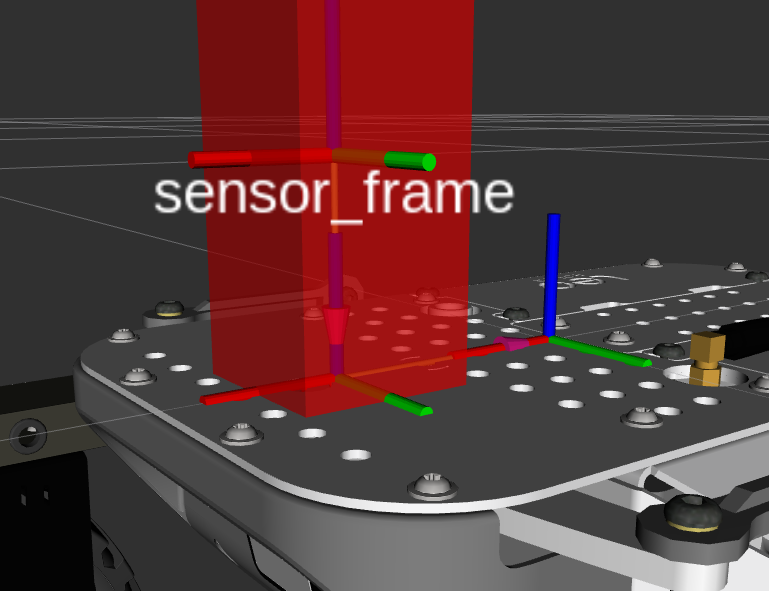
You can use base_link as a reference frame for other links in the model. The exact position of the base_link origin is defined as the center of this mounting hole on the upper plane of the mounting plate:
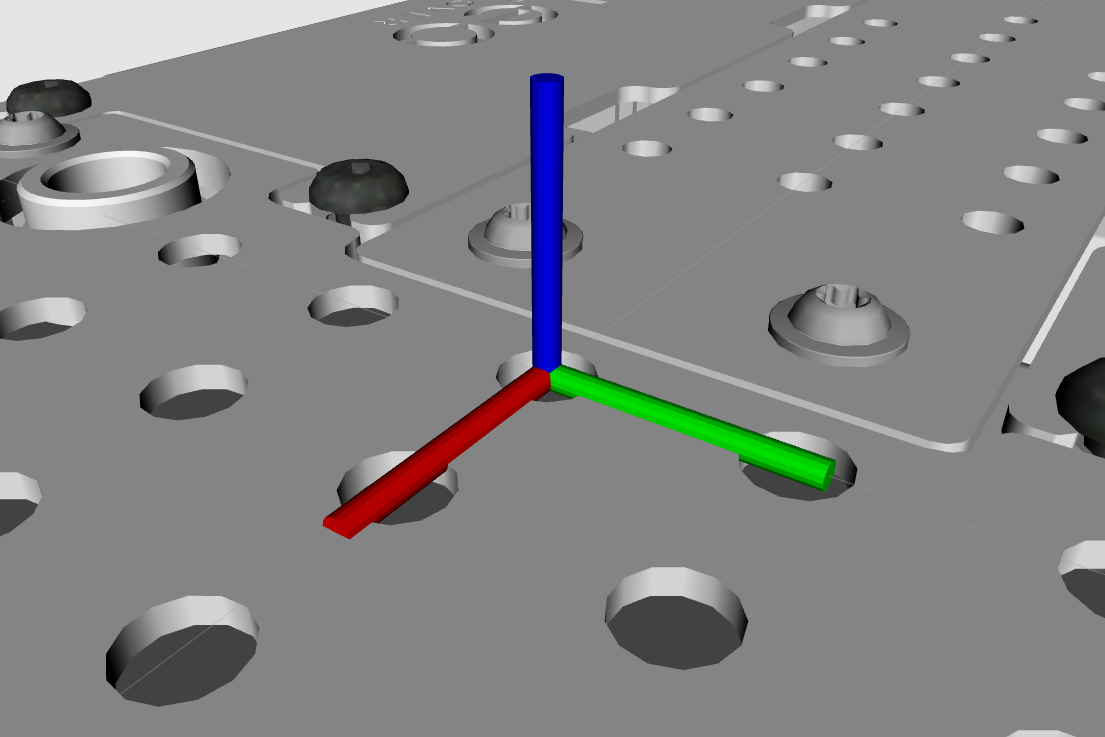
The distance can be easily measured in CAD programs or even using physical measuring tools.
For more examples, you can look at these tutorials:
ROS uses its own build system for building packages. To learn about it, read the catkin/conceptual_overview and catkin/workspaces ROS wiki pages. Here's a brief summary:
The packages are the main unit for organizing software in ROS. The current build system used to build ROS packages is catkin. Catkin packages can be built as a standalone project, but the system also provides the concept of workspaces.
When building a catkin workspace, the install targets are placed into an FHS compliant hierarchy inside the result space. A set of environment setup files allow extending your shell environment, so that you can find and use any resources that have been installed to that location.
The catkin build system also supports an overlay mechanism, where one workspace can extend another result space. An environment setup file from the result space of such workspace will extend your shell environment by packages from both workspaces.
The build system provides a catkin_make command for building workspaces, but we will use catkin command line tool from Python package catkin-tools as it delivers more user-friendly and robust environment for building catkin packages.
In this chapter, we will try to:
Let's start by creating an empty workspace inside home directory on Raspberry Pi:
We want this workspace to extend the prebuilt packages that are already installed on the system. It should be automatically done if you have already sourced the /opt/ros/${ROS_DISTRO}/setup.bash file, but we can also explicitly point out the space to extend:
We need to get the sources of the package to build. If the package is available as a git repository (like in our case), you can use the git clone command:
Some of the packages will require installing additional dependencies to build and run them. As the leo_bringup package is already installed on the system, this step is redundant. For any other package, you can use rosdep to automatically install any dependencies:
Build the workspace:
If everything works, a development space should be created inside the devel directory. Let's source the environment setup file inside it:
Now, when you execute rospack list, you should see all of the packages installed on your system, but rospack find leo_bringup should point you to the directory on your newly created workspace.
The last step is to modify /etc/ros/setup.bash to use our overlay. Simply edit this file (e.g. with nano) by removing or commenting out the first line and adding:
When you start the nodes with the leo-start script, /etc/ros/setup.bash will use your overlay and the /etc/ros/robot.launch file should use the version of leo_robot that you have built in your workspace.
ROS is designed with distributed computing in mind. The nodes make no assumption about where in the network they run. Configuring your computer to be able to communicate with ROS network will let you run nodes that interfere with Leo Rover's hardware, as well as graphical tools (like rqt or rviz) directly on your host machine.
To install ROS on your computer, you can follow this tutorial:
In this section, we will assume you run Ubuntu 18.04 with ROS Melodic.
First, connect your computer to the same network your rover is connected to. It can be either the Rover's Access Point (LeoRover-XXXX by default) or an external router (if you followed Connect to the Internet tutorial).
To properly communicate over the ROS network, your computer needs to be able to resolve the master.localnet hostname. Open a terminal on your computer and type:
If you don't see any output, that means you cannot resolve the hostname.
If you are connected to Rover's Access Point, you should be able to resolve it, but if there is an issue with DNS server on the rover or you are connected through external router, add this line to the /etc/hosts file on your computer:
If everything works, you should be able to ping the rover by it's hostname. To check it, type: ping master.localnet.
Now, to be connected in ROS network, you need to set some environment variables. Start by sourcing the result space you are using:
Specify the address of the master node:
And your IP on the network:
Replace X.X.X.X with your IP address.
You will need these lines executed at every terminal session you want to use ROS on. To do this automatically at the start of every session, you can add this line to the ~/.bashrc file.
You should now be able to do all the things from the first section of this tutorial on your computer.
Apart from allowing communication between different processes on Raspberry Pi, ROS will give us the possibility to remotely control the rover on your computer, as well as run graphical tools to introspect and visualize the current state of the rover. A lot of these tools are available in distribution packages in the form of rqt and rviz plugins.
Below, are some examples possible to do on the stock Leo Rover.
Find us on:
